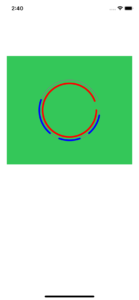
例えばこんな感じの円弧を描画したい場合です。

円弧の描画にUIBezierPathを使うと思いますが、override func draw(_ rect: CGRect) { } の部分で各パラメータを固定値にしていると、いまいち使い勝手が悪いのでは、と思いました。
ということで、これを簡単にする方法はないか試してみました。
円弧の描画を簡単にする方法
ViewControllerで円弧のパラメータを設定できるようにする
下記のようにして、override func draw(_ rect: CGRect) { }の部分を使い回しをできるようにしました。
また、PathDrawで設定したいパラメータをViewControllerで設定できるようにしました。
import UIKit

class ViewController: UIViewController {

    @IBOutlet weak var arcBackgroundView: UIView!

    // PathDraw のインスタンスを生成。
    var firstPathDrawView = PathDraw()
    var secondPathDrawView = PathDraw()

    override func viewDidLoad() {
        super.viewDidLoad()

        drawGrayArc()
        drawBlueArc()
        drawRedArc()

    }
    func drawBlueArc() {
        // 描画したいサイズを指定
        let width = 300
        let height = 300
        firstPathDrawView = PathDraw(frame: CGRect(x: 0, y: 0, width: width, height: height))
        // 各パラメータを設定
        firstPathDrawView.arcCenter = CGPoint(x: arcBackgroundView.frame.width / 2,
                                         y: arcBackgroundView.frame.height / 2)
        firstPathDrawView.radius = 90
        firstPathDrawView.clockwise = true
        firstPathDrawView.arcColor = .blue
        firstPathDrawView.lineWidth = 5
        firstPathDrawView.angle = [[10,50],[70,110],[130,200]]
        // 背景色を透明
        firstPathDrawView.isOpaque = false
        // arcBackgroundView に追加
        arcBackgroundView.addSubview(firstPathDrawView)
    }

    func drawGrayArc() {
        // 描画したいサイズを指定
        let width = 300
        let height = 300

        firstPathDrawView = PathDraw(frame: CGRect(x: 0, y: 0, width: width, height: height))
        // 各パラメータを設定
        firstPathDrawView.arcCenter = CGPoint(x: arcBackgroundView.frame.width / 2,
                                         y: arcBackgroundView.frame.height / 2)
        firstPathDrawView.radius = 90
        firstPathDrawView.clockwise = true
        firstPathDrawView.arcColor = .gray
        firstPathDrawView.lineWidth = 2
        firstPathDrawView.angle = [[0,340]]
        // 背景色を透明
        firstPathDrawView.isOpaque = false
        // arcBackgroundView に追加
        arcBackgroundView.addSubview(firstPathDrawView)
    }

    func drawRedArc() {

        // 描画したいサイズを指定
        let width = 300
        let height = 300

        secondPathDrawView = PathDraw(frame: CGRect(x: 0, y: 0, width: width, height: height))
        // 各パラメータを設定
        secondPathDrawView.arcCenter = CGPoint(x: arcBackgroundView.frame.width / 2,
                                               y: arcBackgroundView.frame.height / 2)
        secondPathDrawView.radius = 80
        secondPathDrawView.clockwise = true
        secondPathDrawView.arcColor = .red
        secondPathDrawView.lineWidth = 5
        secondPathDrawView.angle = [[0,340]]
        // 背景色を透明
        secondPathDrawView.isOpaque = false
        // arcBackgroundView に追加
        arcBackgroundView.addSubview(secondPathDrawView)
    }
}
import Foundation
import UIKit

class PathDraw: UIView {

    var arcCenter =  CGPoint()
    var radius : CGFloat = 0
    var angle : [[CGFloat]] = []
    var clockwise: Bool = true
    var arcColor: UIColor = UIColor.white
    var lineWidth: CGFloat = 1

    override func draw(_ rect: CGRect) {

        let color = arcColor
        color.setStroke()

        let drawAngle = angle
        let count = angle.count

        for i in 0..<count {
            let arc = UIBezierPath(arcCenter: CGPoint(x: arcCenter.x, y: arcCenter.y),
                                   radius: radius,
                                   startAngle: CGFloat(Double.pi) * 2 * drawAngle[i][0] / 360.0,
                                   endAngle: CGFloat(Double.pi) * 2 * drawAngle[i][1] / 360.0,
                                   clockwise: clockwise)
            // 線幅の指定
            arc.lineWidth = lineWidth
            // パスの角を丸くする
            arc.lineCapStyle = .round
            // 描画する
            arc.stroke()
        }
    }
}
使えるようにするには?
- storyboardにviewを用意する
- viewと「@IBOutlet weak var arcBackgroundView: UIView!」を紐付ける
- PathDraw.swiftのファイルをプロジェクトに追加する
- 上記のソースコードをコピペする
内容について
ブルーの円弧のように途切れ途切れの描画をしたい場合は、
firstPathDrawView.angle = [[10,50],[70,110],[130,200]]のように、開始角度、終了角度を設定すればOKです。
また円弧は、
        drawGrayArc()
        drawBlueArc()
        drawRedArc()
というように、グレー、ブルー、レッドの順に描画していて、グレーの上にブルーが描画されています。
この辺は順番を入れ替えて試してもらうと、描画のされ方がどう変わるのかわかると思います。
こちらを参考にしました
円弧の描画や、多次元配列について下記を参考にしました。

[Swift]円弧の描き方 - Qiita
Swift で円弧を描きたい時、UIBezierPath を使います。 1. UIViewクラスを作る PathDraw.swift import UIKit class PathDraw: UIView { override func d...

[Swift]多次元配列の宣言の仕方 - Qiita
多次元配列の宣言の仕方 誤った宣言 let matrix:String = ,] 「Array types are now written with the brackets around th...


コメント